While chatting with friends last night I reported that I was starting a new blog for sharing tips, techniques and stories from my life as a fabric arts instructor. In setting up the blog, the name Diary of a DYEHARD, seemed like
a natural fit. A cute little play on words, intended to pay tribute to
the fiber artists, crafters and quilters walking around with purple thumbs
and the look of inspiration in their eyes.
After registering my blog name online, the oddest thing happened! I immediately started getting "friended", "followed" and "added to the circles" of several men in uniform. Yes, Majors, Sergeants and Lieutenants instead of Quilters, Crafters, and Fiber Artists! At the time of this posting, I am seriously amused by the fact that my 3 day old blog has been "Google +" by 37 of Americas Finest!
Why was my blog attracting all of of these service men? Some of you may think this is happening because these fine men thought they were reading about a "d-i-ehards" not "d-y-ehards." That might very well be. My husband thinks all of this is because of my pretty smile! He is very sweet, but I have a different theory.
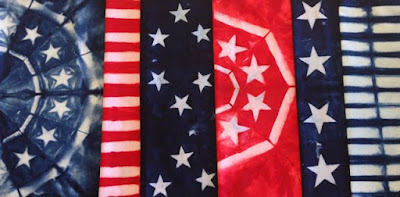
A week before, while contemplating the topic of my first post, I fell in love with some Stars & Stripes patterns that came out of a recent batch of Itajime Shibori. A visit to the Prayer Flag Project page on the same day, gave me just the inspiration I needed. I love the Buddhist idea
of fluttering flags lifting your hopes, dreams and prayers into the wind and carrying
them off to their intended destinations.
With the 4th of July coming, red, white and blue prayer flags seemed the perfect project. I began working on the "Star Spangled Shibori Prayer Flags" by dyeing fabric with Itajime Shibori folds, Stars & Stripes templates, and red and blue dye. (Keep reading for the tutorial!) In the spirit of prayer flags, as I folded, clamped, dyed and stitched, I thought of blessings for our Country, prayed words of hope and gratitude for our Veterans, and meditated on Freedom and Peace worldwide.
I hung the flags in the yard about an hour before I registered my blog name. A gentle breeze picked up and carried the thoughts, hopes and prayers into the wind. Maybe the troops in my circles were the first recipients of my blessings! After all, isn't that how prayer flags are supposed to work?
Don't worry, I also prayed for wisdom for our leaders and politicians! ;)
Here are the instructions for the Stars & Stripes Itajime Shibori fabric-
I started by removing the paper backing on the
For the first design, I cut a fat quarter in half, folded it in half, and then in half again. I want clear and sharp images for this project, I find that any more that 4 layers thick will start to blur the edges. I also get better results with smaller pieces of fabric instead of yardage.
I
sandwich the folded fabric between two small Star Shaped Resist Templates and clamp in place. Clamps should be tight, and have a deep
enough reach so fabric doesn't gather up inside the throat area. I used 3
small stars on the first piece of fabric.
When finished placing templates and clamps, put fabric in a bucket of soda ash and water. Use a cup of soda ash per gallon of water. Be aware that the clamps don't move as you stack fabric in your bucket.
Fold other half of the fat quarter in the same fashion, and place the Large Star Shaped Resist Template in the center of the folded fabric. I use several clamps to create even pressure over the whole shape and each point of the star.
For our Striped fabric, I ironed in 2" accordion pleats, and placed 2 of the
1" x 6" Bar Templates along the length of the finished fan fold. Clamp these in several places. Repeat this with the 1/2" x 6" Bars. Each exposed edge of fabric will collect the dye, and the part under the clamp will remain white.
I
loved that several of the fabrics came out resembling traditional 4th of
July bunting. Those were achieved with a simple wedge fold. There are many variations of the wedge fold. Fold fat quarter in half, fold right corner to bottom edge to begin wedge shape. Flip over and fold second flap of wedge. By flipping this becomes an accordion fold wedge, leaving the exposed edges to collect dye.
Adding a
bar template above and below the star template, across the wedge fold
will outline your pattern, and create the swag effect.
After 30 minutes to an hour in the soda ash, carefully remove the fabric. Leaving templates and clamps in place, gently squeeze fabric to remove any excess liquid. If the fabric is too saturated with water, it will not absorb dye all the way through the layers.
There are many ways to dye Itajime Shibori. As this is a small batch, I used a slightly thickened fiber reactive dye concentrate, applied with squeeze bottles. Using this direct dye application makes it easier to get dye under clamp handles, inside of folds, and in between layers. Alternately,
you could use a vat dyeing method, but clamps have a tendency to move
and pop off as the dye is stirred in the bucket.
Begin
by outlining each edge of the template. If your clamps are tight enough
the Shaped Resist Templates will resist the dye and produce the images of stars. Continue to put dye in between layers, and fill in all surrounding fabric. Flip fabric and repeat on second side.
When dyeing the fan folded fabric, it is important to get dye in between each layer along the edges. This will help your stripes be even and bold.
As
each piece is finished, place it in a plastic bag to "batch" for a
minimum of 8 hours. Because I wanted rich, saturated red, and deep navy, I chose to
leave them for 12 hours before rinsing in cold water, and then washing in a hot machine with a good textile detergent to get rid of the excess dye.
By dyeing
some of the star fabrics red, and some blue, and doing the same with the striped and
wedge folded fabrics, and also a tone on tone "quilter's solid" there will be a wonderful variety of prints
and patterns to design from. My patriotic flags evolved naturally out of the the dancing stars, and bold stripes and rich colors. I kept it simple with starched edges instead of hemmed. I like the idea of these flags becoming a bit tattered over time, just as the country they were made for.


